Introduction to DIY Cabinet Door Making
How to make a cabinet door? Do you crave a fresh look for your cabinets? Making your own cabinet doors can transform your space. It’s a rewarding DIY project for all skill levels. You just need the right approach and tools. This guide will walk you through the entire process.
We’ll start by selecting the best wood and materials. Measurements are vital for a perfect fit. We’ll show you how to cut wood precisely. With decorative edges, your doors will have a custom look. We’ll cover how to assemble the door frame and insert the panel.
Next, we guide you through sanding, priming, and painting for a smooth finish. Installing the doors and hardware is crucial for functionality. The final steps include filling and caulking for a polished look. In the end, you’ll have beautiful cabinet doors made by you.
Ready to get started? Roll up your sleeves, and let’s dive into DIY cabinet door crafting.

Choosing the Right Wood and Materials
Choosing the right materials is the first step in cabinet door making. Here’s what you need:
- Selecting the Wood: Poplar and birch plywood are top picks. They’re easy to paint and work with. If you’re not painting, match the wood species with existing cabinets.
- Plywood: Ideal for the door panel. A quarter-inch thick is common. Go for birch if painting.
- 1×3 Wood Boards: These form the door frame. Poplar is recommended for a painted finish.
- Wood Glue: Essential for securing joints.
- Clamps: They hold pieces together while the glue dries.
- Concealed Hinges: These give a neat look and allow adjustments.
Additional materials might include sandpaper, primer, paint, and tools like saws and drills. Remember to choose high-quality materials for a durable and professional finish.
Measuring and Cutting the Wood Accurately
Measuring your wood is the foundation of a perfect cabinet door. It ensures a snug fit and smooth operation. To begin, measure both the cabinet’s opening and its overall dimensions. Write these down to avoid errors. Make sure to subtract the necessary amount for the door’s inset or overlay as well.
Start by measuring the interior and exterior of the cabinet box to determine the door size. For a tight fit, subtract 1/8 inch from both the height and width for inset doors. For doors that partially overlay, add twice the overlay amount to both dimensions.
Next, sketch a quick drawing with the measurements marked. This will help you visualize the door and double-check your calculations. Remember, wood boards advertised sizes are not always exact. A 1×3 board usually measures 2.5 inches in width, not 3 inches.
Cut the frame pieces—stiles (vertical sides) and rails (horizontal tops and bottoms)—with accuracy. A miter saw or table saw is ideal for straight cuts. Keep extra wood for test cuts or adjustments.
It’s critical to label your cut pieces. Mark them in a way that indicates their position in the door. This saves confusion later during assembly. Ensure your saw blade is sharp and your measurements are exact. A well-measured and precisely cut door is easier to assemble and looks professional once installed.

Routing and Creating Decorative Edges
Creating the perfect decorative edges makes your cabinet doors stand out. It’s a blend of precision and art. This step can give your doors a custom, upscale look. Here’s how to achieve those professional-looking decorative edges:
- Choose a Router Bit: Select a router bit that fits the design you want. A common choice is a round-over bit.
- Setting Up the Router: Set your router to the correct depth. Ensure the bit’s cutting edge aligns with the wood’s surface.
- Routing the Edges: Carefully guide the wood along the router table. Keep the wood flat against the table and fence for even cuts.
- Sanding the Edges: After routing, smooth the edges with sandpaper. Start with a coarser grit and move to a finer one for a polished look.
- Practice Runs: Always make a few practice runs on scrap wood. This will help you get used to the router and avoid mistakes.
- Safety First: Wear safety goggles and ear protection. Keep fingers away from the router bit during operation.
- Patience Is Key: Take your time with each pass to avoid burns or gouges in the wood.
These steps help in creating a sophisticated edge design that enhances the overall look of your DIY cabinet doors. With each careful pass of the router, the beauty of your craftsmanship comes to life.
Assembling the Cabinet Door Frame
Assembling your cabinet door frame sets the stage for a sturdy product. This step is fun and rewarding. Here’s a foolproof way to assemble the frame:
- Dry-fit the Pieces: Lay out stiles and rails to check the fit.
- Label Parts: Mark each piece with a number. This keeps track of their placement.
- Drill Pocket Holes: Use a Kreg Jig for strong joints. For newbie woodworkers, this tool is a godsend.
- Attach Rails to Stiles: Secure stiles and rails with screws and wood glue. Clamps can help hold the frame tight.
- Create a Notch for the Panel: Cut a groove along the inside edge of the frame to seat the panel.
- Check for Square: Ensure the frame is perfectly square before it’s glued.
Remember to take your time. Haste can lead to mistakes and wasted materials. With patience, you’ll have a well-built door frame. After the frame is assembled, you’re ready for the next step: inserting the panel. Don’t be afraid to try, even beginners can make stunning cabinet doors.
Inserting and Securing the Panel
Once you’ve meticulously crafted your door frame, it’s time to insert the panel. This part can either be made from plywood or any other material you select, based on aesthetic preference or functionality. Here’s a straightforward method to secure the panel in your door frame:
- Measure the Panel: Ensure the panel’s dimensions are slightly smaller than the frame’s interior. This allows easy insertion and some room for wood expansion.
- Cut to Fit: Use the table saw to trim the panel to size. Multiple passes may be necessary for a precise fit. Always measure twice, cut once!
- Dry-Fit the Panel: Before applying any glue, place the panel inside the frame. It should fit snugly, without forcing.
- Apply Wood Glue: Spread a thin layer of glue along the groove you created in the frame. This secures the panel.
- Insert the Panel: Carefully place the panel into the frame. Press it into the glue-lined groove.
- Clamp It Down: Use clamps to hold the structure firmly as the glue dries. Check the door is flat and the panel sits right.
- Wipe Excess Glue: Clean away any glue that spills out immediately. A damp cloth works well.
- Leave to Dry: Allow plenty of time for the glue to set. Rushing this step could compromise the door’s integrity.
Following these steps, the panel should now be an integral part of the door, offering both strength and style to your DIY cabinet project.
Sanding, Priming, and Painting
After assembling your cabinet door frame and securing the panel, it’s time for finishing touches. The next steps – sanding, priming, and painting – give your door that smooth, professional look. Here is a simplified guide to complete this process.
Sanding Your Cabinet Door
Smooth edges are key for a flawless finish. Start by sanding down the entire door with rough sandpaper. Gradually use finer grits for a polished surface. Sand with the grain to avoid scratches. Always wear a mask to avoid dust inhalation.
Priming the Wood
A primer prepares the wood for painting. It helps paint stick better and last longer. Choose a good-quality primer for best results. Apply it with smooth, even strokes. Let it dry as the can directs, then lightly sand for a smooth base.
Painting Your Cabinet Door
Choose paint that suits your room’s style and wood type. For best results, use a foam roller or brush. Apply thin coats rather than one thick coat. Let each layer dry completely before adding the next. Patience here pays off with a beautiful finish.
In each step, take your time. Rushed work might mean more sanding and repainting later. Do it right, and your doors will look like they were made by a pro. When the paint is dry, you’re ready for installation!
Installing the Cabinet Doors and Hardware
After painting, it’s time to install the doors. This step is exciting. You’re close to finishing! Follow these steps to ensure your cabinet doors hang perfectly:
- Attach the Hinges: First, align your concealed hinges with the door. For each hinge, mark the screw holes on the door. Drill pilot holes for the screws to prevent wood splitting. Then, attach hinges.
- Mount the Doors: Lift the door to the cabinet frame. Line up the hinges with the frame. Make sure they’re level. Drill pilot holes for the hinge screws in the frame. Screw the hinges in place.
- Adjust the Hinges: Concealed hinges allow adjustments. Align the doors evenly with the cabinet frame. Use the adjustment screws to shift the door up, down, left, or right. This ensures the door fits perfectly.
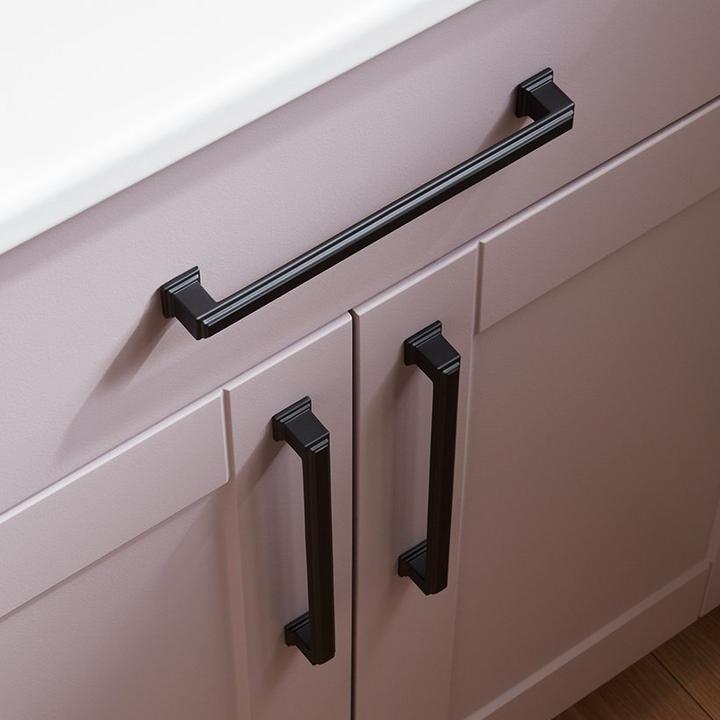
- Add the Hardware: Now, choose handles or knobs. Place them where you want on the door. Use a template for consistent placement. Drill holes and fix the hardware.
- Test the Door: Open and close the door several times. Make sure it swings freely. The door should not stick or wobble.
- Finish Up: Tighten all the screws. Add soft-close mechanisms if desired. Step back and check your work. Your doors are now installed!
This step brings your project near to completion. The hardware adds functionality and style. Take your time to do it right. Soon, you’ll admire a cabinet with beautifully crafted doors, made by you.
Final Touches: Filling and Caulking
Once your doors are painted and hung, it’s time for the last details. This step makes your doors look seamless and professionally finished. Here’s what to do:
- Filling: Check for any small gaps or holes. Use wood filler or Bondo to patch them. Wait for it to dry as per the product’s instructions. Then sand down the area until it’s smooth.
- Caulking: Apply caulk with a caulk gun along the seams where the panel meets the frame. Smooth the caulk line with a damp finger or a caulk tool. This hides the joint and gives a clean appearance.
- Touch-Up Paint: After filling and caulking, you might need to touch up with paint. Use a small brush for precision. This covers any repairs and keeps the finish looking even.
- Hardware Installation Tips: If installing knobs or pulls, measure carefully. Use a template to ensure they are at the same height on each door. Mark the spots, drill holes, and fix the hardware firmly.
These steps give your DIY cabinet doors a flawless look. Don’t rush; take your time to get each detail right. Your patience will pay off, and you’ll take pride in your work. Enjoy your upgraded space with the doors you made!
Conclusion: Admiring Your Handiwork
After all the measuring, cutting, and assembling, your work is almost done. Stand back and take a look. You’ve taken raw materials and transformed them into something both functional and beautiful. Your DIY cabinet doors reflect your effort, skill, and attention to detail.
As a beginner or seasoned DIYer, each project lends you more confidence. Progress from simple designs to complex ones. Each step, from selecting wood to installation, was a learning curve. Now, you can admire the doors you created and the improved look they give your space.
Remember, this is more than just a functional update to your home. It’s a personal touch that adds character. Your hard work paid off. The doors fit perfectly and swing smoothly. The finish is smooth and the edges are sharp. The hardware shines as a final accent. Your DIY journey has a tangible reward.
You’ve gained valuable skills on how to make a cabinet door. Use these in future home improvement projects. Friends and family will be impressed. They might even ask for your help in their own DIY endeavors. Keep this guide as a resource for next time.
Enjoy the satisfaction of a job well done. Take pride in knowing you’ve crafted something by hand. These doors are not just a part of your home; they’re a testament to your DIY spirit.