Overview of Raised Panel Cabinet Doors
How to make raised panel cabinet doors? Raised panel cabinet doors add elegance and charm to any kitchen or bathroom. They feature a frame-and-panel construction, where the center panel rises slightly above the surrounding frame, creating a beautiful depth and dimension. These doors are beloved for their classic look and the sense of luxury they bring.
In crafting raised panel cabinet doors, precision and attention to detail are vital. The process involves several steps, from the initial design to the final installation. Each step requires skill and specific techniques to ensure that the panels fit perfectly within the frame, operate smoothly, and withstand the rigors of daily use.
Learning how to make raised panel cabinet doors can be a rewarding DIY project. It not only adds value to your home but also gives you the satisfaction of creating something beautiful with your own hands. Whether you’re an experienced woodworker or a motivated beginner, this guide will walk you through each stage of the process.
Necessary Tools and Materials
Before you begin learning how to make raised panel cabinet doors, gather all necessary tools and materials. Proper preparation ensures a smoother workflow and a better end result. Here’s what you’ll need for your project:
- Measuring tape: To take precise measurements of the cabinet opening and door size.
- Table saw or circular saw: These are essential for making clean, straight cuts on your wood.
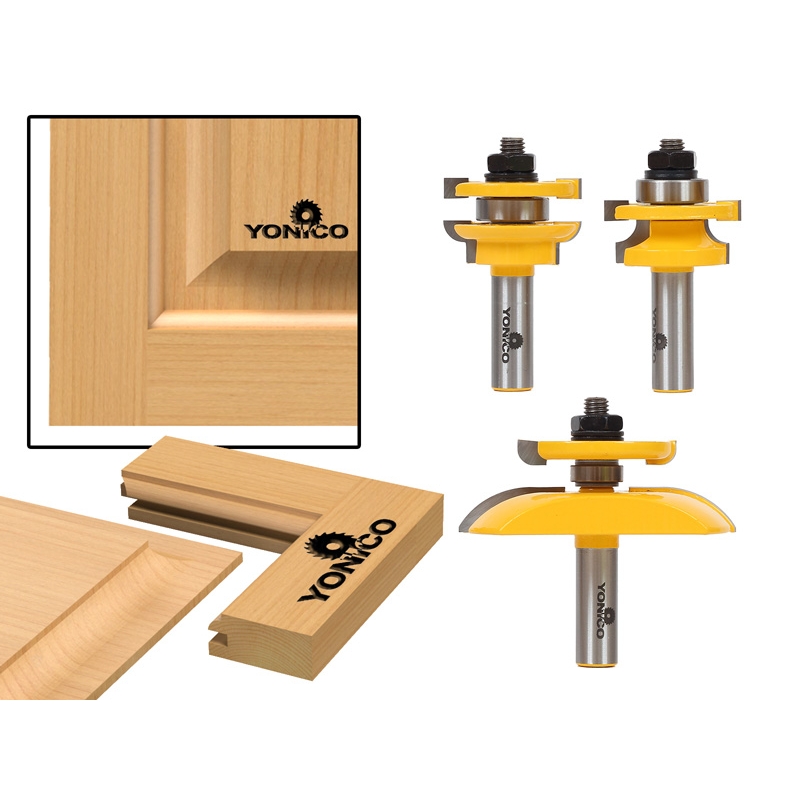
- Router and router bits: A router with a set of raised panel bits helps form the door’s characteristic edges and panel profiles.
- Miter saw: This saw is ideal for cutting the frame pieces to length with precision.
- Drill and drill bits: For drilling pilot holes for screws and other hardware.
- Clamps: You’ll need several clamps to secure the wood while cutting and assembling.
- Wood glue: Essential for assembling the door frames and panels securely.
- Sandpaper or a power sander: To smooth out all wood surfaces before finishing.
- Finishing supplies: Depending on your preference, choose paint, stain, or sealant to finish the wood.
- Safety gear: Don’t forget safety glasses and hearing protection when operating power tools.
Ensure each tool is in good working condition and practice safety measures while using them. Although the list may seem long, having the right tools at hand will make the process of making raised panel cabinet doors efficient and enjoyable.
Designing Your Raised Panel Doors
Designing your raised panel cabinet doors is the first step toward creating a bespoke look for your kitchen or bathroom. Start by measuring the dimensions of your cabinet openings to determine the size of the doors. Remember to factor in space for the door to swing open without hitting surrounding fixtures.
Next, choose the style of raised panel you prefer. There is a variety of designs, from traditional to modern, that can complement the overall aesthetic of your space. Sketch your design or use a software program to visualize the door. This step is crucial as it dictates the materials and cuts needed later on.
Consider the following while designing your doors:
- Door size: Every door must fit its cabinet precisely. Allow for a small gap, usually 1/8 inch, between the door and cabinet frame for smooth operation.
- Panel design: Decide on the shape and pattern of the raised panel. It could be rectangular, arched, or any other form to match your interior design.
- Wood type: The choice of wood will affect the door’s appearance and durability. Popular options include oak, cherry, and maple.
- Detailing: Think about adding decorative edges or profiles to the frame, which can be done with specialized router bits.
Sketch out a few variations and consult with household members or a professional if needed. Good design is both functional and aesthetically pleasing, so take your time to plan it well. The design phase is integral to learning how to make raised panel cabinet doors that are both beautiful and lasting.
Cutting and Assembling the Frame
Once you’ve designed your raised panel doors, it’s time to cut and assemble the frame. The frame gives structure to the door and holds the panel in place. Follow these steps to ensure precision:
- Measure Twice, Cut Once: Double-check the dimensions of your door design. Use your tape measure for accurate length and width.
- Prepare Your Tools: Set up your miter saw and table saw, confirming they’re aligned correctly for straight cuts.
- Cut the Stiles and Rails: Use the miter saw to cut the vertical stiles (sides of the frame) and horizontal rails (top and bottom) to your measured lengths.
- Router the Edges: With the router and raised panel bits, shape the edges of your frame pieces. This creates a groove for the panel and decorative profiles.
- Dry-Fit the Frame: Without using glue, assemble the frame to check fitment. Adjust as necessary.
- Glue and Clamp: Apply wood glue to the joints. Clamp the frame securely until the glue sets.
- Reinforce with Screws: For added strength, drill pilot holes and insert screws where the stiles and rails meet.
Make sure all materials are cut and assembled squarely to avoid issues with door alignment later on. This step is critical, as a flawless frame will ensure that your raised panel fits perfectly and operates smoothly. Don’t rush this process, as accuracy now will pay off in the final product. Remember to clean up any excess glue before it dries to maintain a professional finish on your cabinet doors.
Creating the Raised Panels
Creating the raised panels is a crucial step in making your cabinet doors stand out. It’s where precision meets artistry. Here is how you can create the raised panels for your doors:
- Select the Wood: Pick the wood that matches your design and is suitable for the panel.
- Measure and Cut: Based on your door size, measure the wood for the center panel and cut it.
- Router Time: Fix the panel onto the router table. Use the raised panel bit to shape the edges.
- Fit to Frame: Make sure the panel fits snugly into the frame’s grooves. Trim if necessary.
- Smooth the Surface: Sand the panel surface until it is smooth, preparing it for finishing.
- Final Check: Insert the panel into the frame to ensure a perfect fit before the final assembly.
Remember to make light passes with the router to avoid wood tear-out. Take your time with each step, as the raised panel is the centerpiece of your door. With the right tools and a steady hand, you’ll create a beautiful, raised effect for your cabinet doors.
Sanding and Finishing Techniques
Once you have assembled your raised panel cabinet doors, the next step is the sanding and finishing. Proper sanding and finishing not only enhance the door’s appearance but also protect the wood. Follow these techniques to achieve a professional look:
- Start with Coarse Sandpaper: Begin with a lower grit sandpaper to remove any rough spots or glue residue. Move in the direction of the wood grain to prevent scratches.
- Progress to Finer Grits: Gradually switch to higher grit sandpaper for a smoother finish. Sand the entire door evenly, paying extra attention to the edges and corners.
- Clean the Surface: After sanding, wipe down the doors with a tack cloth to remove all dust. A clean surface will ensure a better finish adhesion.
- Apply the Finish: Choose your finish, such as stain or paint, and apply it with a brush or sprayer for even coverage. Work in a well-ventilated area and follow the product’s instructions.
- Let it Dry: Allow the finish to dry completely. Refer to the manufacturer’s recommendations for drying times.
- Apply Additional Coats: For added durability and depth, apply additional coats. Sand lightly between coats with a very fine sandpaper.
- Final Sanding: After the last coat, do a final light sanding with ultra-fine sandpaper to achieve a silky smooth finish.
- Seal the Wood: If using a stain, apply a sealer to protect the wood and prolong the life of the doors. Allow it to cure fully before installation.
These sanding and finishing techniques lay the groundwork for stunning and long-lasting raised panel cabinet doors. Attention to detail in this phase will reflect in the quality of your DIY project.
Installing the Cabinet Doors
After crafting your raised panel cabinet doors, installing them is the final step. Proper installation ensures that the doors function correctly and align with the aesthetic of the room. Here’s a straightforward process to guide you through the installation:
- Attach Hinges: Start by attaching the appropriate hinges to the doors. Position them accurately to ensure smooth opening and closing.
- Mark Placement: Hold the door up to the cabinet to mark where the hinges will connect. Ensure it’s level and centered.
- Drill Pilot Holes: Once marked, drill pilot holes for the screws. Pilot holes prevent wood splitting and make for easier screwing.
- Secure Hinges to Cabinet: With the pilot holes in place, secure the hinges to the cabinet body with screws.
- Adjust for Alignment: Close the door to check for gaps and alignment. Adjust the hinges until the door fits perfectly.
- Install Hardware: Attach knobs or handles to your cabinet door at your preferred height, usually around two to three inches from the bottom of upper cabinets and the top of lower cabinets.
- Final Check: Open and close the door several times to confirm smooth operation. Make any final adjustments needed.
Remember, patience is key during the installation process to ensure that the details of how to make raised panel cabinet doors are showcased properly. With these steps, your doors will not only look great but also function beautifully for years to come.
Troubleshooting Common Issues
While learning how to make raised panel cabinet doors, you may encounter some common issues. Below are solutions to troubleshoot and fix these problems effectively:
- Panel Doesn’t Fit: If your panel is too big for the frame, measure the excess and trim carefully. If too small, you may need to remake the panel.
- Uneven Gaps: Check for squareness in your frame assembly. Adjust the hinges to align the door correctly.
- Sticking Doors: Sand down the areas where the door sticks. Apply wax or lubricant to ease the movement.
- Loose Joints: If joints in the frame loosen, apply more wood glue. Clamp the joint and let it dry.
- Finish Flaws: For drips or runs in finish, sand the area lightly. Reapply the finish for a smooth look.
- Screws Not Holding: If screws won’t grip, use larger ones or plug the hole with a wooden dowel and re-drill.
Addressing these issues as they arise will lead to better end results. Practice and patience are key when working on how to make raised panel cabinet doors.


