Part 1: Introduction to Cabinet Handle Installation – The Importance of Proper Placement
Level 1: Why Cabinet Handles Matter
Cabinet handles, also known as pulls or knobs, are more than just functional hardware—they play a crucial role in the overall aesthetics and usability of your cabinets. How to install cabinet handles? Properly installed handles enhance accessibility, streamline design, and add a finishing touch to your kitchen, bathroom, or furniture.
- The Role of Handles in Functionality:
Handles provide an easy grip for opening and closing cabinets, making them essential for daily use. Poorly installed handles can lead to frustration, uneven alignment, or even damage to the cabinet doors. - Impact on Aesthetic Appeal:
Handles contribute significantly to the visual harmony of a space. Whether you choose sleek modern pulls, vintage-inspired knobs, or rustic iron handles, their placement and installation quality can make or break the look of your cabinets.
Level 2: Key Considerations Before Installation
Before diving into the installation process, it’s important to plan carefully to ensure a smooth and professional result.
- Choosing the Right Handles:
Select handles that complement the style and finish of your cabinets. Consider factors like size, shape, material, and color to ensure they align with your overall design vision. - Measuring for Consistency:
Consistent spacing and alignment are critical for a polished appearance. Measure carefully to determine the ideal placement for each handle, taking into account the size of the cabinet doors and drawers.

Part 2: Tools and Materials Needed – Preparing for Success
Level 1: Essential Tools for Handle Installation
How to install cabinet handles? Having the right tools on hand ensures that the installation process is efficient and precise. Below are the key tools you’ll need:
- Drill and Drill Bits:
A power drill is essential for creating holes for the handle screws. Use the appropriate drill bit size to match the diameter of the handle screws. - Measuring Tape and Ruler:
Accurate measurements are crucial for consistent handle placement. A measuring tape and ruler help you mark exact positions before drilling.
Level 2: Additional Accessories and Supplies
Beyond the basics, there are additional items that can make the job easier and improve the final outcome.
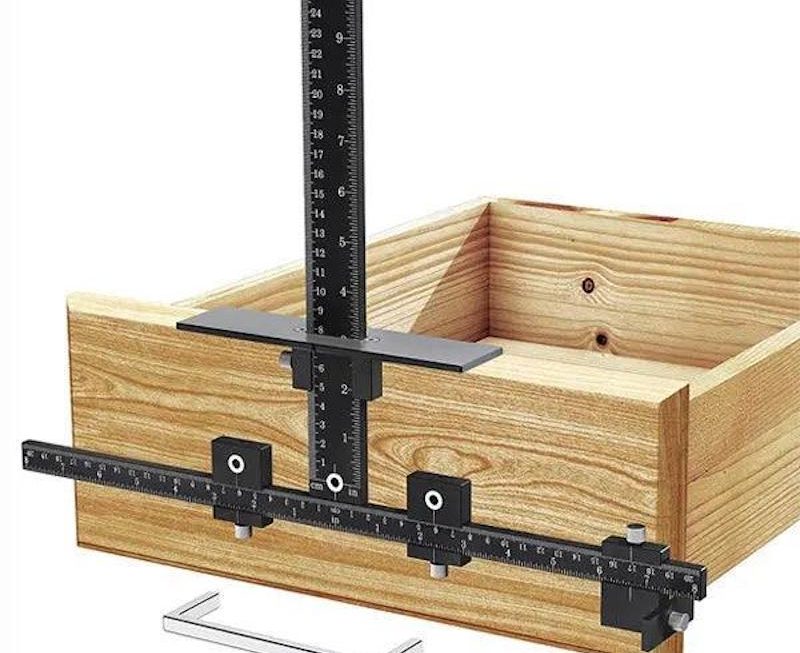
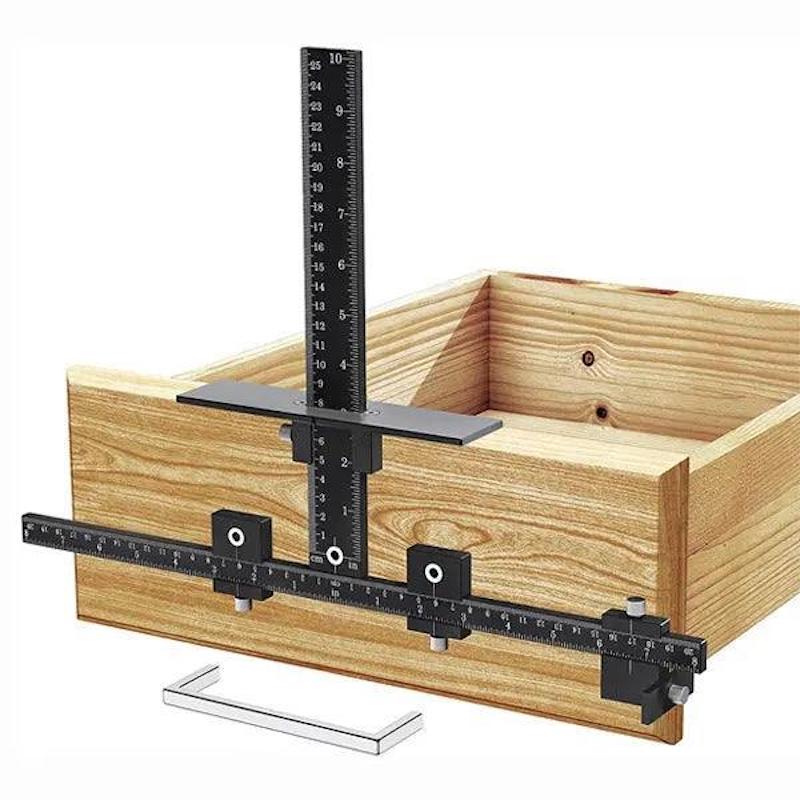
- Template Guides or Jigs:
For multiple cabinets, using a template guide or jig ensures uniformity across all handles. These tools allow you to replicate precise measurements quickly and efficiently. - Screwdrivers and Screws:
Ensure you have the correct screwdriver type (Phillips or flathead) and extra screws in case any are lost or damaged during installation.
Part 3: Step-by-Step Installation Process – Achieving Professional Results
Level 1: Preparing the Cabinets for Installation
How to install cabinet handles? Proper preparation sets the foundation for successful handle installation. Follow these steps to get started:
- Cleaning the Surface:
Before marking or drilling, clean the cabinet doors and drawers thoroughly to remove dust, grease, or debris. This ensures accurate measurements and prevents contamination of the hardware. - Marking Placement Points:
Use a pencil to lightly mark where the holes will be drilled. For consistency, measure from the edges of the cabinet door or drawer and double-check your measurements before proceeding.
Level 2: Drilling and Securing the Handles
Once the preparation is complete, follow these detailed steps to install the handles securely:
- Drilling Pilot Holes:
Start by drilling small pilot holes at the marked points. Pilot holes prevent the wood from splitting and make it easier to insert the screws. Be careful not to drill too deeply, as this could damage the interior of the cabinet. - Attaching the Handles:
Align the handle over the pilot holes and secure it with the provided screws. Tighten the screws evenly but avoid over-tightening, which can strip the threads or crack the wood.
Part 4: Troubleshooting Common Issues – Ensuring a Flawless Finish
Level 1: Addressing Misalignment Problems
Even with careful planning, mistakes can happen. Here’s how to fix common alignment issues:
- Uneven Spacing Between Handles:
If some handles appear misaligned, loosen the screws slightly and adjust their position. Re-measure and re-drill if necessary to achieve uniformity. - Handles Not Level:
Check whether the cabinet doors themselves are level. If the doors are warped or improperly hung, address those issues first before reinstalling the handles.
Level 2: Fixing Structural Damage
Occasionally, errors during installation may cause structural problems. Here’s how to remedy them:
- Split Wood or Enlarged Holes:
For split wood, apply wood glue to the affected area and let it dry before reattaching the handle. If the hole is too large, use a dowel or epoxy filler to reinforce it before redrilling. - Stripped Screw Holes:
If the screw holes become stripped, insert toothpicks or wooden matchsticks coated with glue into the hole. Allow them to dry, then trim flush before reinstalling the screws.
Part 5: Behind the Scenes – Tips from Professional Installers
Level 1: Pro Tips for Precision
Professional installers share valuable advice to help you achieve flawless results every time.
- Double-Check Measurements Twice:
Measure twice, drill once—a golden rule in carpentry. Taking the extra time to verify dimensions minimizes errors and saves effort in corrections later. - Work in Sections:
If installing handles on multiple cabinets, work in small sections rather than attempting everything at once. This approach allows you to maintain focus and consistency throughout the project.
Level 2: Advanced Techniques for Perfection
Seasoned professionals employ advanced methods to tackle challenging installations with ease.
- Using Clamps for Stability:
Secure the cabinet door or drawer with clamps to prevent movement while drilling. This technique ensures stability and reduces the risk of misaligned holes. - Sand Edges After Drilling:
After attaching the handles, lightly sand any rough edges around the drilled holes. This step enhances the smoothness and professionalism of the finished product.
Maintenance and Care for Longevity
Level 1: Cleaning and Upkeep
Regular maintenance keeps your cabinet handles looking new and functioning smoothly.
- Routine Cleaning:
Wipe down handles regularly with a damp cloth to remove fingerprints, grease, or dirt. Avoid abrasive cleaners that could scratch or dull the finish. - Checking for Loose Screws:
Periodically inspect the screws to ensure they remain tight. Over time, frequent use can cause screws to loosen, compromising the stability of the handles.
Level 2: Refreshing and Replacing Handles
Over time, you may want to update or replace your handles to refresh the look of your cabinets.
- Refinishing Existing Handles:
For metal handles, consider polishing or refinishing them to restore their original shine. Rust-resistant sprays or lacquers can extend their lifespan. - Upgrading to New Styles:
Changing out old handles for modern designs is an affordable way to give your cabinets a fresh, updated appearance. Simply unscrew the existing handles and install new ones following the same installation process.
By understanding what makes proper handle installation essential, preparing effectively, following step-by-step instructions, troubleshooting issues, and embracing future trends, you can fully unlock the potential of your cabinets. Whether you’re seeking functionality, elegance, or sustainability, perfectly installed handles offer endless possibilities—one precise detail at a time!
Conclusion: Elevating Your Space with Perfectly Installed Handles
Level 1: Celebrating the Impact of Proper Installation
How to install cabinet handles? Installing cabinet handles may seem like a small task, but its impact on functionality and aesthetics is significant. Well-placed handles transform ordinary cabinets into elegant, user-friendly features that enhance your living space.
- A Universal Solution:
Whether you’re updating a kitchen, renovating a bathroom, or customizing furniture, properly installed handles elevate the overall design. Their versatility ensures they remain relevant across various styles and settings. - Inspiring Future Projects:
As you gain confidence in handle installation, consider tackling larger projects like full cabinet refacing or DIY furniture builds. Each step builds skills and inspires creativity.
Level 2: Looking Ahead – Trends in Cabinet Hardware
With ongoing advancements in design and technology, the future of cabinet handles holds immense potential for innovation and personalization.
- Smart Handles with Integrated Technology:
Imagine handles equipped with fingerprint sensors, LED lights, or Bluetooth connectivity. Such innovations would redefine convenience and security in the home. - Sustainable Materials and Finishes:
Eco-conscious consumers are increasingly drawn to handles made from recycled materials or finished with non-toxic coatings. These options align with sustainability goals while maintaining high performance.