Types of Hinges Suitable for Cabinet Doors
Before diving into the method of how to install hinges on cabinet doors, it’s crucial to understand the different types of hinges available and their suitability for your cabinet. The choosing right hinges can impact the functionality and look of your cabinet doors. Here are the most commonly used hinges for cabinet doors:
- Butt Hinges: These are traditional hinges that consist of two plates connected by a pin. They are durable and suitable for a variety of door styles.
- Concealed Hinges: Also known as Euro hinges, these are hidden when the door is closed and provide a clean, modern look to cabinet doors. They are adjustable and work well for frameless cabinets.
- Flush Hinges: Flush hinges are similar to butt hinges but require less space since one plate nests into the other when closed. They are a good option for smaller, lighter doors.
- Self-Closing Hinges: These hinges have a built-in mechanism that pulls the door closed gently, which is convenient for kitchen cabinetry.
- Demountable Hinges: These allow for easy removal of the door without unscrewing the hinges, which is handy for cleaning and maintenance.
- Pivot Hinges: Mounted at the top and bottom of the door, pivot hinges allow the door to rotate within its frame, which is an ideal choice for tall, heavy doors.
Selecting the right type hinges is essential for the proper installation and long-term functioning of your cabinet doors. Consider the door’s size, weight, and the style of your cabinet when choosing your hinges. In the following sections, we’ll cover the tools and materials you’ll need to proceed with the hinge installation process.
Tools and Materials Needed for Hinge Installation
To successfully install hinges on cabinet doors, you’ll need the right tools and materials. Here’s a list to get you started:
- Screwdriver: A must-have tool for fastening screws on the hinges.
- Drill: With various bit sizes, the drill will make pre-drilling holes for screws easier.
- Chisel: Essential for carving out mortises if your installation requires them.
- Measuring Tape: Accurate measurements are critical for proper hinge placement.
- Carpenter’s Pencil: For precise marking where you’ll place your hinges.
- Level: To ensure your cabinet doors hang straight and even.
- Hinges: Choose the type suited to your cabinet as discussed in the previous section.
- Screws: The right size screws will secure your hinges in place.
- Safety Glasses: Protect your eyes when drilling or chiseling wood.
- Clamps: Hold the door steady while you work on it.
Gather all these items before you start. This will help you avoid interruptions and make the installation process smooth and efficient. Remember, using the correct tools not only makes the job easier but also helps prevent damage to your cabinet doors and frames.
Preparing the Cabinet Door and Frame
Before you start to install hinges, preparing the cabinet door and frame is vital. Ensure your work area is clear. Remove any old hardware from the cabinet door and frame first. Fill in old screw holes with wood filler if needed. Let the filler dry according to the product instructions. Sand down the area for a smooth finish. Clean the surface to remove dust or debris. Check the wood’s condition. Repair any damage to ensure a secure fit for your new hinges. Make sure the door is free of damage. It should fit well within its frame. Keep all tools and materials close by for easy access. By taking these steps, you set a good foundation for the installation process. Proper preparation supports a smooth and successful hinge installation on your cabinet doors.
Measuring and Marking for Hinge Placement
To properly install hinges on cabinet doors, precise measuring and marking are key. Start by determining the position of the hinges. Standard practice is to place them 5 inches from the top and bottom edges of the door. If your door is taller, you may need to add a middle hinge for extra support.
Use a measuring tape to find the right spots. Mark these points with a carpenter’s pencil. Keep the marks light, so they won’t be hard to remove later. Double-check your measurements. Accuracy here prevents issues with door alignment later.
Now, align the hinge with your marks. The hinge should be centered, with its edge parallel to the edge of the door. Trace around the hinge plates. This will show you where you need to cut if your hinges require mortises. If you’re using surface-mounted hinges, these marks show where to drill pilot holes for screws.
When marking for screw holes, ensure they’re even spaced. Uneven spacing can cause the screws to misalign, which might make the door hang incorrectly. Always take your time during this step. Careful measuring and marking are essential for a flawless hinge installation.
Cutting Mortises for the Hinges
When you’re learning how to install hinges on cabinet doors, cutting mortises is a key step. This is especially true if you are using butt hinges or any hinges that require a recessed space in the door edge. Here’s how to proceed with precision and care:
- Outline the Mortise: Use the lines you traced earlier to define where the mortise will go.
- Depth of Mortise: Determine how deep the mortise needs to be. Usually, it’s as thick as the hinge plate.
- Chiseling Out: Pick up your chisel and hammer. Place the chisel within the outline. Tap carefully with the hammer. Remove small wood pieces to form a shallow recess.
- Checking the Fit: Place the hinge plate in the mortise. Check that it sits flush against the door edge. If it’s not flush, remove more wood carefully.
- Finishing Touches: Once the hinge sits flush, clean up any rough edges inside the mortise.
Take your time with each step. Keep the chisel sharp for clean cuts. Working carefully prevents damage to the cabinet door. If you rush, you risk a poor fit that can impact door functionality. With patience and attention to detail, you’ll create perfect mortises for your hinges.
Attaching the Hinges to the Cabinet Door
With your cabinet door prepared and the mortises cut, it’s time to attach the hinges. Follow these steps to ensure secure and proper hinge attachment:
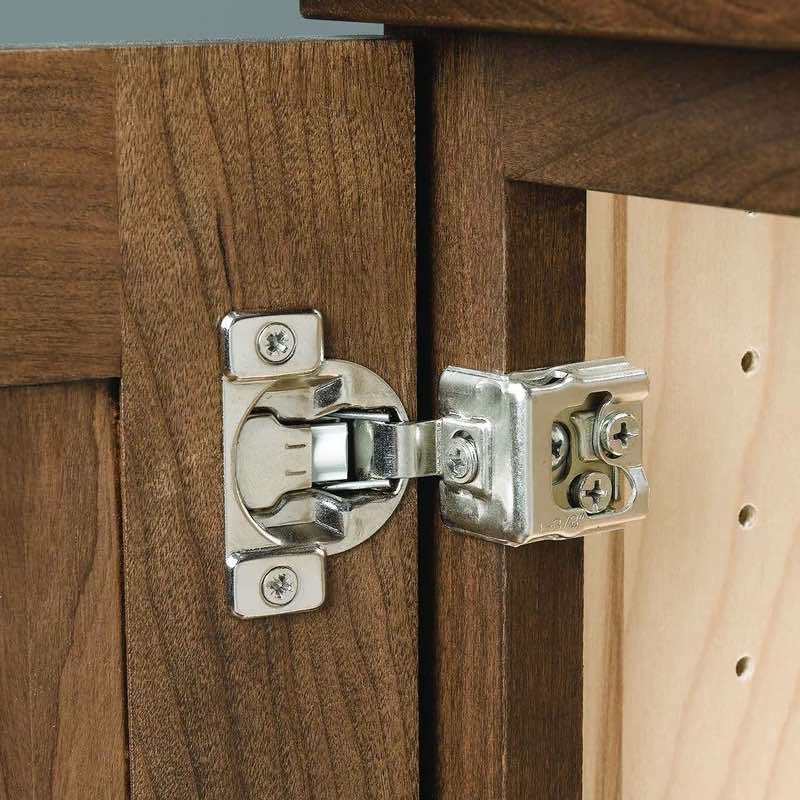
- Position the Hinge: Align the hinge plate with the mortise you’ve cut. Make sure it sits flush.
- Mark the Screw Holes: Use the carpenter’s pencil to mark the points for the screws. Keep your marks precise.
- Pre-drill Holes: Using a drill, create pilot holes where you’ve marked. This makes screwing easier and prevents wood splitting.
- Attach the Hinge: Place screws in the drilled holes. Use a screwdriver to fasten the hinge plate into the door.
- Check Movements: Gently move the hinge to ensure it swings freely. This check is necessary before attaching the door to the frame.
Repeat these steps for each hinge you need to install. Remember to place hinges at the designated spots marked earlier. Doing this provides balanced support for the door. Take care not to overtighten the screws, as this can strip the wood and weaken the joint. Right after attaching the hinges, double-check their alignment. If you spot any misalignment, adjust the hinges before proceeding. Correctly attached hinges are the foundation for a door that swings smoothly and closes correctly. Let’s move on to aligning and securing the door to the cabinet frame.

Aligning and Securing the Door to the Cabinet Frame
Once you have attached the hinges to the cabinet door, the next step is to align and secure the door to the actual cabinet frame. This phase is critical to ensure the door operates smoothly and fits well within the cabinet’s structure. Here’s the process broken down into simple steps:
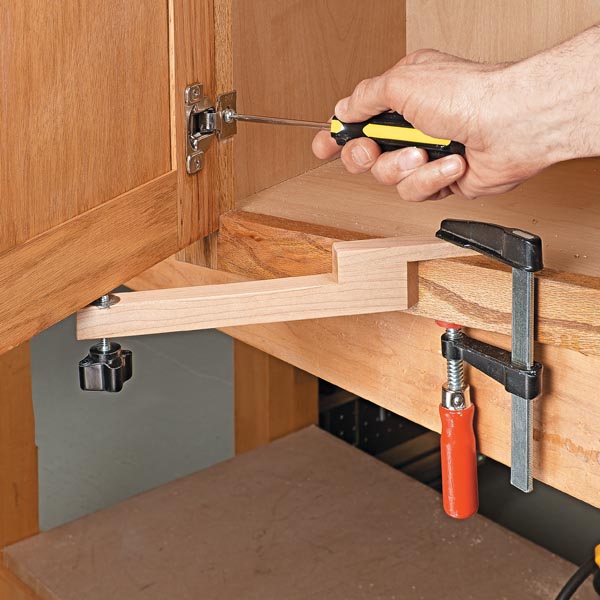
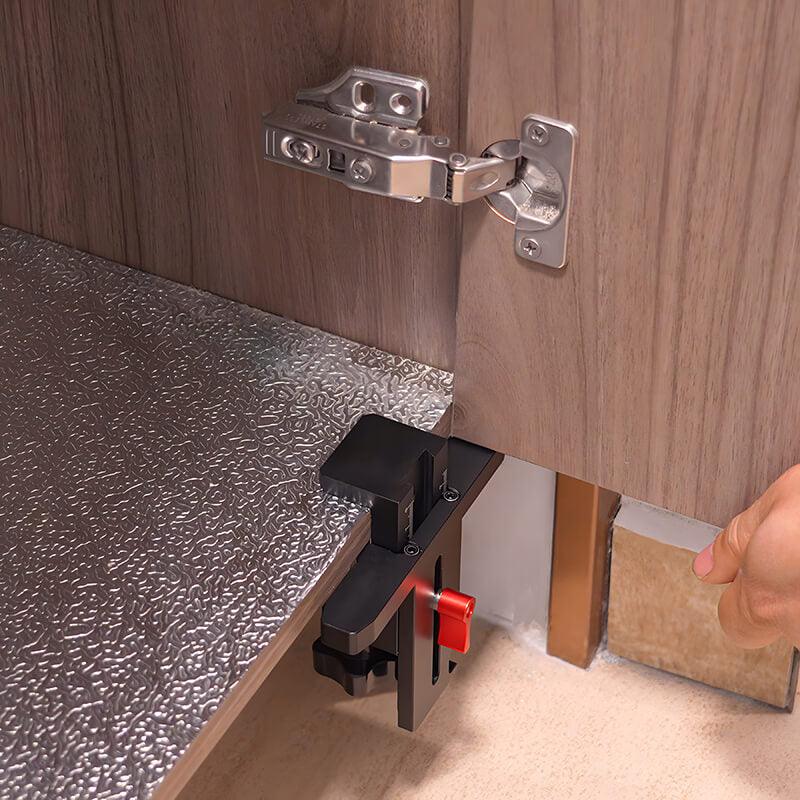
- Position the Door: Hold the door up to the frame to align it. Use clamps to keep it in place.
- Adjust for Alignment: Make sure the door is level with the frame. You may need to adjust the clamps until it’s just right.
- Mark Frame for Hinges: With the door positioned, trace where the hinge plates meet the frame.
- Drill Pilot Holes: Drill pilot holes at the marks you’ve made on the frame.
- Attach the Hinges: Secure each hinge to the frame using a screwdriver and screws.
- Test the Door’s Swing: Open and close the door to check its movement. It should swing freely.
- Fine-Tune as Necessary: If the door isn’t perfectly aligned, adjust the hinges slightly until you achieve a proper fit.
During this entire process, keep your measurements accurate and your adjustments precise. Even slight misalignments can cause the door to hang improperly or fail to close completely. Using the right screws is also important, as they will hold the weight of the door and should fit both the hinge and the frame material.
Be gentle while handling the door and the tools to avoid any damage to the door or the frame. Aligning and securing the cabinet door requires patience and careful attention to detail, but once done correctly, your cabinet doors will function beautifully.
Adjusting the Hinges for Perfect Door Movement
After securing the door to the frame, fine-tuning the hinges is crucial for a seamless door operation. Here are the steps for adjusting the hinges to attain perfect movement:
- Check the Door’s Movement: Open and close the door several times. Note any sticking points or misalignment.
- Loosen Screws Slightly: If adjustments are needed, slightly loosen the screws on the hinge plates.
- Reposition the Door: Shift the door up or down, left or right, to rectify any misalignment.
- Tighten the Screws: Once aligned, tighten the screws to lock the hinges in the new position.
- Test Door Swing: Open and close the door to ensure it swings without obstruction.
- Examine Gap Consistency: Look at the space around the door. It should be even on all sides.
- Review Again: Double-check that the door closes flush with the cabinet frame.
Adjustments to the hinges may be a process of trial and error. If the door doesn’t sit right after these steps, repeat them. Slight tweaks can make a big difference. With patience, you’ll align the door for an ideal swing and fit.
Remember to take your time during this final adjustment stage. Correctly adjusted hinges lead to a door that functions properly and lasts longer. Once adjusted, your cabinet door should open and close smoothly with even gaps, culminating in a professional-looking finish for your cabinetry project.
Maintenance Tips for Cabinet Door Hinges
Proper maintenance ensures longevity and smooth operation of your cabinet door hinges. Here’s how to keep them in top condition:
- Regular Cleaning: Wipe hinges with a soft cloth. Remove dust and grime to prevent build-up.
- Lubrication: Apply a light lubricant if hinges begin to squeak. Use it sparingly.
- Tightening Screws: Check screws periodically. Tighten any that are loose to prevent sagging doors.
- Checking Alignment: Inspect door alignment. Adjust hinges if doors hang unevenly or don’t close properly.
- Avoid Moisture: Keep hinges dry. Wipe away moisture immediately to avoid rust.
- Inspect for Wear: Look for signs of wear or damage. Replace hinges that show considerable wear.
Following these simple steps will keep your cabinet doors functioning well and looking great. Remember, caring for your hinges can prevent issues and extend the life of your cabinets.