Preparing for Medicine Cabinet Removal
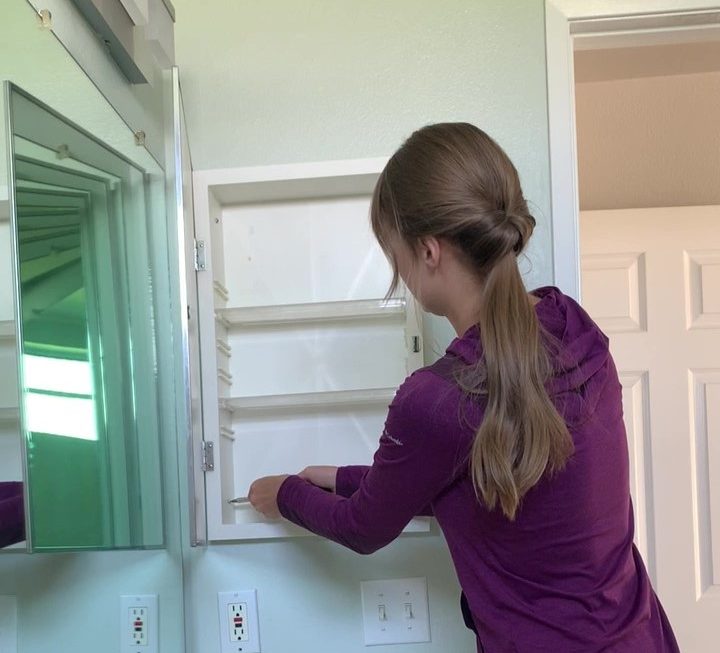
How to remove medicine cabinet? Before diving into the removal of your medicine cabinet, it’s crucial to prepare adequately. This preparation ensures your own safety and the protection of your bathroom space during the process. Let’s go through the essential steps to get ready for this task.
Ensure a Clear Workspace
Start by clearing out all your toiletries and other items from inside the cabinet. This step prevents any accidental falls or damages while you work. Also, clear the surrounding area, giving yourself ample space to maneuver tools and the cabinet itself.
Safeguard Your Sink and Countertops
Lay down a thick blanket or towels over the sink and countertops. This helps protect against scratches or damage from tools or parts of the cabinet when removing.
Turn Off the Power
If your medicine cabinet has built-in lighting or electrical outlets, turn off the power to this area. This prevents any electrical shocks and keeps you safe.
By following these simple yet effective preparatory steps, you are setting the stage for a smooth and safe removal of your medicine cabinet.
Tool Checklist for Medicine Cabinet Disassembly
Before you start removing your medicine cabinet, gathering the right tools is important. This checklist will help you ensure you have everything you need for an efficient and safe disassembly process.
- Screwdrivers: Have both Phillips and flathead screwdrivers on hand.
- Hammer: Needed for removing hinge pins or loosening stuck components.
- Pliers: Useful for pulling out small nails or clips.
- Putty Knife: Helps in prying the cabinet off the wall if it’s glued.
- Safety Glasses: Protect your eyes from dust and debris.
- Gloves: Protect your hands from sharp edges and broken glass.
Check off each item as you gather them so you don’t miss anything. Having the right tools will make the process of how to remove a medicine cabinet smoother and prevent unnecessary damage to your bathroom.
Step 1: Clearing the Work Area
Start by removing all items from the inside of the cabinet. This step is essential to prevent any objects from falling or getting damaged during the removal process. Ensure that the workspace around the medicine cabinet is free from obstructions, giving you ample room to work comfortably and safely.
Next, move anything that might hinder your mobility or pose a trip hazard. This might include bathmats, wastebaskets, and decorative items. A clear floor space is important to help you avoid accidents.
If your bathroom medicine cabinet is located above a sink or vanity, consider covering these fixtures with a protective cloth or towel. This will help avoid scratches or other damage to your countertops and sink during the disassembly process.
By creating a safe and uncluttered work area, you’re paving the way for a trouble-free removal of your bathroom medicine cabinet.
Step 2: Detaching the Cabinet Door
After clearing your workspace, the next step is to safely remove the cabinet door. Do this carefully to avoid any damage to the door or yourself.
Remove the Screws or Hinges
Locate the screws that hold the door to the cabinet. Use a Phillips or flathead screwdriver, depending on the screw type. Turn the screws counterclockwise until they’re free. If hinges hold the door, you might need a hammer. Use it with a screwdriver to gently tap the hinge pins out.
Handle with Care
Once the screws or hinges are loose, gently take the door off. Hold it firmly to avoid dropping. If it’s heavy or large, you may want help to avoid accidents or damage.
Set Aside Safely
Place the door in a secure area where it won’t be stepped on or damaged. Ensure it’s on a soft surface to prevent scratches or glass breakage.
Removing the cabinet door is straightforward if you have the right tools and handle everything with care. This step is essential in learning how to remove a medicine cabinet safely and is key to a successful disassembly. Next, we’ll be focusing on clearing out the internal components like the shelves.
Step 3: Taking Out the Cabinet Shelves
After removing the door, it’s time to focus on the cabinet shelves. These often hold an array of items and need careful handling to prevent damage.
Lift Out or Unscrew Shelves
Start by lifting each shelf gently from its support. Some shelves might be screwed in, requiring a screwdriver. Turn screws counterclockwise to remove them. Keep screws in a container to avoid losing them.
Clean as You Go
As you remove the shelves, wipe them down. This is a good chance to clean areas that are usually hard to reach. A mild cleaner and a soft cloth work well for this purpose.
Store Shelves Safely
Once the shelves are out, store them in a secure place. Make sure they are on a soft surface to avoid scratches. Store them away from the work area to prevent accidents.
Removing the cabinet shelves may seem simple, but handle them with care. This step is important when learning how to remove a medicine cabinet. Proper removal prevents damage and prepares you for the next step.
Step 4: Removing the Medicine Cabinet Mirror
Removing the mirror is a delicate process that requires careful handling to prevent breakage or injury.
Protect Yourself with Safety Gear
Before starting, put on safety glasses and gloves. This will shield your eyes and hands from glass shards.
Loosen the Clips or Brackets
Identify the clips or brackets holding the mirror. Use a screwdriver to unscrew these fasteners.
Gently Remove the Mirror
Once unfastened, cautiously lift the mirror away from the cabinet. Have a partner assist you if needed for safety.
Place the Mirror on a Soft Surface
Set the mirror down on a padded area to avoid damage. This can be a carpeted floor or a covered table.
Remember, dealing with glass calls for extra caution. Take your time and handle the mirror gently as you learn how to remove a medicine cabinet mirror.
Step 5: Extracting the Cabinet from the Wall
Once the mirror and shelves are out, the next task is to take the cabinet off the wall. This step requires caution and precise movements.
Safely Disconnect the Cabinet
Look for screws or brackets securing the cabinet to the wall. Use your screwdrivers to turn these counterclockwise and remove them. If the cabinet feels stuck, it might be glued. For glued cabinets, slide a putty knife behind the edges. Gently work it loose without damaging the wall.
Get Help if Needed
If your cabinet is large or heavy, ask someone to help you. They can support the weight as you disconnect it. This prevents the cabinet from falling and causing injury or damage.
Keep the Wall Intact
Be mindful not to pry too hard or fast. You want to avoid creating wall damage. If the cabinet does not come off easily, take a step back. Reassess and approach from a different angle or with more help.
Set the Cabinet Down Gently
Once detached, carefully move the cabinet to a safe spot. Lay it down on a protective layer like a blanket or towel. This reduces the risk of scraping or damages.
Extracting the medicine cabinet from the wall is a crucial step. Do it slowly and with the right tools to maintain safety and to protect your bathroom wall.
Step 6: Breaking Down the Cabinet
After you have taken the cabinet off the wall, it’s time to break it down. Do this carefully to prevent damage to the parts, in case you plan to reuse or donate them.
Disassemble the Frame
Start with the outer frame if it’s separate from the body. Unscrew any fasteners holding it to the cabinet. Keep all screws and brackets in a safe place.
Take Apart the Body
Work on the cabinet body. Remove any remaining screws or hardware. Pull apart the pieces gently. Go slow to avoid breaking any components.
Label Pieces for Reassembly
If you plan to put it back together, label each piece. This makes reassembly easier. You can use small strips of masking tape and a marker for this.
By breaking down the cabinet with caution, you preserve all parts for future use. Make sure to store the disassembled pieces securely until you’re ready to clean, fix, or reassemble them.
Step 7: Cleaning and Fixing Individual Components
After disassembling the cabinet, focus on cleaning and repairing the parts. Start with the shelves, door, and the mirror. Use a mild cleaner for streak-free shine. A soft cloth helps avoid scratches. For repairs, assess each component.
Check the door hinges and handles for wear. Tighten loose screws or replace worn parts. Examine the mirror for chips or cracks. Be cautious, as glass can break easily. If damaged, consider getting a new mirror. Don’t forget the cabinet body. Look for signs of mold or water damage. Clean thoroughly and let dry.
Look for dents or misalignments in the frame. Use pliers to straighten bent metal. Fill any holes with wood putty if needed. Let putty dry and sand it down for a smooth finish. Clean up dust from sanding before reassembly.
Collect all the screws, brackets, and small parts. Check if they’re fit for reuse. Match each part with its corresponding component. This ensures a quicker reassembly process. By cleaning and repairing now, you make future reassemblies easier and quicker.
Step 8: Reassembling the Medicine Cabinet (Optional)
If you plan to use the same medicine cabinet again, reassembly is your next step. Here’s how to put it back together:
Attach the Frame and Body
Start by connecting the frame to the body of the cabinet. Align the pieces and insert screws into the holes. Turn screws clockwise to tighten.
Secure the Shelves
Place the shelves back into their original positions. If they were screwed in, reattach with the screws you set aside. Make sure they are level.
Mount the Door
Reattach the cabinet door with hinges or screws. Make sure it opens and closes smoothly. Adjust as needed for the perfect alignment.
Replace the Mirror Carefully
Carefully set the mirror back into place. Secure with previously removed clips or brackets. Handle the mirror with care to avoid accidents.
Follow these steps with patience and precision, and your medicine cabinet will be good as new. Remember to perform each step slowly to avoid errors or damage.
Step 9: Securing the Cabinet Back on the Wall (Optional)
Once you have cleaned or replaced any necessary parts of the medicine cabinet, you may choose to reattach it to the wall. The following steps will ensure that your cabinet is secured safely and correctly.
Position the Cabinet Carefully
Lift the cabinet and hold it against the wall where it was previously located. Use a level to confirm that it is straight.
Mark the Mounting Holes
With the cabinet in place, use a pencil to mark where the mounting brackets or screws will go. Make sure these are in line with the existing holes or studs in the wall.
Drill Pilot Holes
If you need fresh holes, drill pilot holes where you marked. This step may not be needed if you’re using existing holes.
Secure the Cabinet with Screws
Align the cabinet with the holes and start inserting screws. Tighten them by turning clockwise, but do not overtighten. Overtightening can damage the wall or cabinet.
Double-Check for Stability
Give the cabinet a gentle pull to check for stability. It should feel firmly attached to the wall.
Add Final Touches
Reattach doors, shelves, or mirrors if you had removed them for cleaning or repair. Close the door and ensure it latches correctly.
By implementing these steps, you ensure that your medicine cabinet is secure and functional. Remember, reattaching a cabinet is optional. If you are upgrading, you may not need to reinstall the old one.
Additional Tips for a Hassle-Free Medicine Cabinet Removal
When working on how to remove a medicine cabinet, considering additional tips can make the job smoother. Here are some pointers to consider during the process.
Stay Organized
As you remove each part, keep all screws and hardware organized. Small bags or containers labeled with their contents will help you stay on track.
Work with a Partner
Having someone to assist you can make a big difference. A partner can help hold the cabinet while you unscrew it, reducing the risk of damage.
Protect Your Flooring
Cover your bathroom floor with an old sheet or cloth, especially if you have tiles. This helps prevent chips or scratches from dropped tools.
Use the Right Tools
Using the right size and type of screwdriver can prevent stripping the screws. Stripped screws make the job harder and can damage the cabinet.
Take Photos for Reference
Before you start, take pictures of the cabinet assembly. This can serve as a guide when you want to reassemble or replace the cabinet.
Keep Calm and Patient
If parts are stuck or stubborn, avoid using excessive force. Patience and gentle persistence often yield better results than haste and strength.
Following these additional tips can save you time and trouble when removing your medicine cabinet. Stay safe and work systematically for the best outcome.


