Introduction to Shaker Cabinet Doors
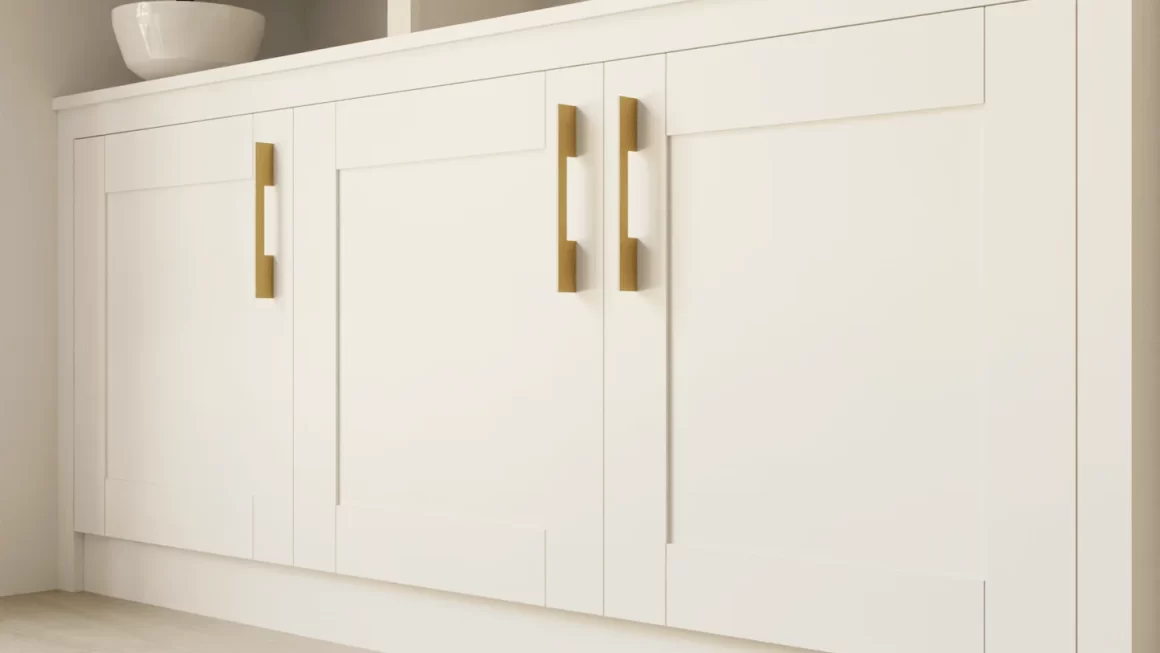
How to make a shaker cabinet door? Shaker cabinet doors are a popular choice for many homes. They feature a simple, clean design that is both functional and aesthetically pleasing. Often identified by their flat panels and square edges, these doors blend well with various decor styles, making them versatile for kitchen, bathroom, or any cabinetry needs.
What are Shaker Cabinet Doors?
How to make a shaker cabinet door? Shaker cabinet doors are characterized by their classic, minimalist look. They consist of a flat center panel surrounded by a square frame. This simple design not only makes them highly durable but also gives a timeless elegance to any space. Whether you’re upgrading your kitchen or just need a change, Shaker doors are a reliable choice.
Benefits of Choosing Shaker Style
Choosing Shaker-style cabinet doors offers several advantages:
- Versatility: Their simple design complements a wide range of decor, from traditional to modern.
- Timelessness: Shaker doors withstand trends, ensuring your kitchen always looks current.
- Ease of Maintenance: The flat surfaces make them easy to clean and maintain.
- Cost-Effectiveness: They can be more affordable than more ornate styles, making them great for budget-conscious renovations.
With these benefits, it’s clear why Shaker cabinet doors are a favored option for many homeowners looking to combine functionality with style.
Tools and Materials Needed
To start crafting your Shaker cabinet doors, you’ll need to assemble the right tools and materials. This ensures a smoother project flow and quality results.
Essential Tools for the Build
Crafting Shaker cabinet doors requires specific tools. Here’s what you’ll need:
- A miter saw to make precise cuts
- A table saw for cutting larger pieces
- A router and router table to create tenon and groove cuts
- Various clamps to hold pieces securely
- A drill with assorted bits
- A sander for smooth finishes
- A tape measure and pencil for accurate measurements
Having this equipment ready will make your woodworking process efficient and enjoyable.
Selecting the Right Materials
The materials you choose are crucial to the appearance and durability of your Shaker doors.
- Hardwood or MDF for the door frame
- Plywood or matching wood for the center panel
- Wood glue to assemble components
- Screws and hinges for installation
- Sandpaper, primer, paint or stain for finishing touches
Consider the cabinet’s use and location when choosing materials. Bathrooms might require moisture-resistant wood, while kitchens could benefit from hardwoods for longevity.
Measuring and Planning
Proper measurement and planning are crucial for crafting perfect Shaker cabinet doors. This step ensures that all parts fit well together.
Calculating Dimensions for Your Doors
Begin by measuring the cabinet frame where the doors will be installed. Record height and width. Add clearance as needed for opening and closing doors smoothly. Calculate the dimensions of the center panel by subtracting the width of the frames from the total door size.
Creating a Cut List with a Spreadsheet
After obtaining your measurements, create a cut list. This list helps organize and track all pieces needed. Use a spreadsheet for precision and ease. Input your dimensions to calculate the required wood sizes. This avoids waste and errors during the cutting phase.
Cutting and Assembling Components
Before you start cutting and assembling, ensure all your tools and materials are on hand. This stage involves precise cutting and careful assembly of the rails and stiles, which form the framework of your Shaker cabinet doors.
Preparing Rails and Stiles
First, you need to cut the rails and stiles using a miter saw. Refer to your spreadsheet cut list for exact dimensions. Typically, the stiles (vertical pieces) and rails (horizontal pieces) are cut from hardwood or MDF. Ensure each piece is marked clearly to avoid confusion during assembly. Always double-check measurements before cutting.
Assembling the Door Frame
After cutting, move on to assembling the frame. Lay out the rails and stiles on a flat surface. Use wood glue at the joints to connect the stiles and rails, forming a rectangular door frame. Clamps can be used to hold the pieces securely while the glue dries. For added strength, you might consider using screws or dowels, although these are optional and depend on your preference and the tools available. Ensure the frame is square by checking the diagonals before the glue sets.
Routering Techniques
How to make a shaker cabinet door? For creating Shaker cabinet doors, mastering the routering techniques is essential. This stage shapes the tenons and grooves which form the pivotal joints of your cabinet doors.
Setting Up for Tenon/Tongue and Groove Cuts
Begin by setting up your router and router table. Choose the correct bits for the tenon or tongue and groove cuts. Always practice on scrap wood first. This ensures your settings are perfect before working on the actual pieces. Make sure the router bit matches the thickness of your materials for a snug fit.
Achieving Precise Cuts
To get precise cuts, you’ll need to adjust the router bit to the exact depth. Check the alignment by using a sample piece of wood. Always keep the router stable and move the wood slowly through the cut. This helps avoid any mistakes that could waste material or require a redo. Repeat the same process for all your rails and stiles, keeping a steady hand and eye on the measurements.
Panel Preparation and Installation
After successfully assembling the frame for your Shaker cabinet doors, you’ll now focus on the central panel. This is the flat part that fits securely within the frame, providing that classic Shaker look.
Selecting and Cutting the Panel
Choosing the right panel material impacts both the aesthetics and the functionality of your doors. For a painted finish, medium-density fiberboard (MDF) serves well, while hardwood plywood is ideal for staining to match the frame.
Here’s how to select and cut your panel:
- Choose panel material based on your final finish plan.
- Measure the opening within the frame, then add 1/2 inch to both the height and width for the panel to fit into the grooves.
- Use a table saw to cut the panel to your measured dimensions.
- Confirm the panel fits by placing it in the frame without glue.
Securing the Panel in the Frame
To secure the panel within the frame, follow these steps:
- Apply a thin line of wood glue within the frame’s grooves.
- Insert the panel into the grooves, ensuring a tight fit.
- Clamp the door assembly until the glue dries. Avoid over tightening to prevent bending.
- Wipe away excess glue promptly with a damp cloth.
Securing the panel correctly ensures a durable, professional-looking cabinet door. The snug fit aids in the structure and function of your Shaker door.
Finishing Touches
How to make a shaker cabinet door? Once your Shaker cabinet doors are assembled, it’s time for the finishing touches. This stage determines the final look and durability of your doors, so take your time to ensure a quality outcome.
Sanding and Painting/Staining
Before you paint or stain, sand your doors thoroughly. Start with a coarser grit sandpaper to remove rough spots. Swap to a finer grit for a smooth finish. Wipe off sawdust with a damp cloth after sanding.
For painting, apply a primer first. It helps the paint stick and last longer. Choose a paint color that fits your decor and apply two coats. Allow the paint to dry completely between coats.
If you prefer stains, pick one that highlights the wood’s natural grain. Apply the stain with a rag or brush. Work in sections, blending edges together. Once the stain dries, apply a clear coat for protection.
Installing Hardware and Hinges
Next, attach hardware and hinges to your doors. Measure and mark where each piece will go. Drill pilot holes for screws to avoid splitting the wood. Screw on the hardware and hinges. Be sure they’re tight, but don’t over-tighten.
For a consistent look, use a template to place handles or knobs. A template ensures proper alignment on all doors.
Once you’ve attached all the hardware, your Shaker cabinet doors are nearly ready to hang. Stand back and review your work to ensure everything looks as expected.
Installation and Maintenance Tips
Embarking on the final steps, it’s crucial to know how to mount your newly crafted doors correctly and keep them in top-notch condition over time.
Mounting Your Shaker Cabinet Doors
Mounting your doors is straightforward with the right approach. Ensure you align hinges perfectly to the cabinet frame. Mark where your screws will go. Drill pilot holes to avoid wood splitting. Secure hinges with screws; don’t overtighten. Hang your doors, adjusting as necessary for a clean fit.
Long-term Care and Maintenance
To maintain the pristine look of your Shaker cabinet doors, regular care is important. Wipe them with a damp cloth to remove dirt and fingerprints. Avoid harsh chemicals that can damage the finish. Check hinges yearly, tighten if loose. With proper care, your doors will last for years, looking as good as new. Remember, simple maintenance can extend the life and beauty of your Shaker doors.


