
Introduction to Built-In Bookcase Projects
In 2024, a built-in bookcase around a window is a fantastic way to maximize space and add a touch of elegance to any room. It transforms an ordinary window into a cozy reading nook or display area. This home improvement project is perfect for DIY enthusiasts who love woodworking and home decor. It provides a personalized, functional, and aesthetically pleasing solution to storage needs.
Creating a built-in bookcase might seem daunting, but with careful planning and the right materials, it becomes an achievable project. This guide will help you navigate each step, from initial planning to the final touches. You don’t need to be a professional carpenter to complete this project. However, patience and attention to detail are essential. Let’s dive in and transform that blank wall space into a beautiful built in bookcases around window.
Planning Your Built-In Bookcase
Before you start cutting wood, you need a clear plan. Your first step is measuring the space around your window. Measure the height, width, and depth of the area where you want to install the bookcase. Consider how the bookcase will fit with your existing decor. Sketch a rough design of your bookcase, noting the dimensions and how many shelves you want.
Gathering Materials and Tools
Once you have your design, it’s time to gather materials. You will need plywood or MDF for your shelves, a back panel, and trim. The amount of material depends on your measurements. You will also need screws, wood glue, and paint or stain for finishing. Tools required include a saw, drill, screwdriver, level, measuring tape, and paintbrushes.
Budgeting for Your Project
It’s essential to set a budget for your project. The cost of materials can vary greatly. Quality plywood and paint might cost more, but they offer durability and a professional finish. Decide whether you want to splurge on high-end materials or keep it budget-friendly. Additionally, factor in the cost of any tools you might need to purchase or rent.
Safety Considerations
Safety is paramount when working on a DIY project. Ensure you have protective gear such as goggles, gloves, and a dust mask. Keep your work area clean and organized to prevent accidents. Follow all safety instructions for using power tools. Have a first aid kit nearby in case of an emergency.
Preparing the Space
Before constructing your bookcase, prepare the space around your window. Remove any baseboards or trim that are in the way. Clean the area thoroughly, removing any dust or debris. If there are any gaps or imperfections in the wall, fill them with spackle and sand smooth.
Marking and Measuring
Use a level and measuring tape to mark where your bookcase will sit. It’s crucial to ensure that everything is level and square. Mark the positions of your vertical supports and shelves on the wall. This step will guide you during the construction process and ensure a precise fit.
Cutting the Wood
Next, cut the wood to your measured dimensions. If you’re using plywood, ensure each cut is accurate to avoid wasting material. Measure twice and cut once to minimize mistakes. Label each piece of wood to keep track of where it will fit in the assembly.
Dry Fitting
Before final assembly, do a dry fit of your pieces. Assemble the bookcase without screws or glue to ensure all pieces fit correctly. This step helps identify any adjustments needed before committing to the final build. Make any necessary corrections to the pieces to achieve a perfect fit.
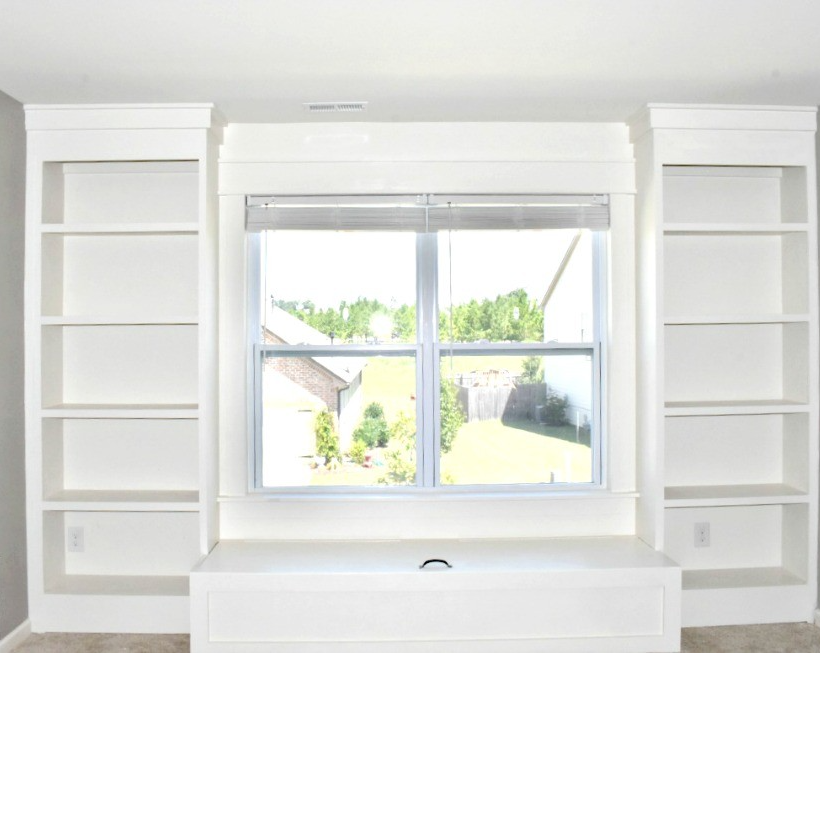
Building the Frame
With everything ready, it’s time to build the frame of your bookcase. The frame supports the shelves and provides structural integrity.
Assembling the Vertical Supports
Start by assembling the vertical supports. Attach the vertical pieces to the wall using screws and wall anchors. Ensure each support is level and securely fastened. These vertical supports will carry the weight of the shelves and books, so sturdiness is crucial.
Attaching the Horizontal Supports
Once the vertical supports are in place, attach the horizontal supports. These pieces will form the skeleton of your bookcase. Use wood glue and screws to secure each joint. Keep everything level and square as you work.
Reinforcing the Frame
To strengthen the frame, add corner braces where the vertical and horizontal supports meet. These braces prevent the frame from wobbling or shifting over time. Reinforcing the frame ensures your bookcase lasts for years and safely holds the weight of your books and decorations.
Installing the Shelves
With the frame complete, you can start installing the shelves. The shelves are the most functional part of your bookcase, so take care to install them correctly.
Positioning the Shelves
Position your shelves according to your earlier measurements. Make sure each shelf is level before securing it. Mark the positions of screws or brackets to avoid guesswork during installation.
Securing the Shelves
Secure the shelves to the frame using screws or brackets. If you’re using screws, pre-drill holes to prevent the wood from splitting. Use enough screws to distribute the weight evenly. For a cleaner look, counter-sink the screws and cover the holes with wood filler.
Adjusting for Level
After securing all the shelves, check again to ensure they are level. Small adjustments can be made by tapping the shelves into place with a rubber mallet. Ensuring everything is level will prevent books and items from sliding off the shelves.
Finishing Touches
The frame and shelves are now in place, but your bookcase isn’t finished yet. The finishing touches will make it look polished and professional.
Installing the Back Panel
Install a back panel if your design includes one. A back panel adds stability and a finished look. Secure the panel with small nails or screws. Make sure the material is cut to fit snugly within the frame.
Adding Trim and Molding
Add trim and molding to give your bookcase a professional finish. Use wood glue and finish nails to attach the trim. Fill any gaps or nail holes with wood filler. Sand the trim smooth to prepare for painting or staining.
Painting or Staining
Choose a paint or stain that complements your room’s decor. Apply a primer before painting if you’re using plywood or MDF. Use a small brush for detailed areas and a roller for larger surfaces. Apply several coats for even coverage and a durable finish.
Final Inspection
Once the paint or stain is dry, inspect your bookcase for any imperfections. Touch up any areas that need additional paint or filler. Make sure all shelves are secure and the finish is smooth.
Decorating Your Bookcase
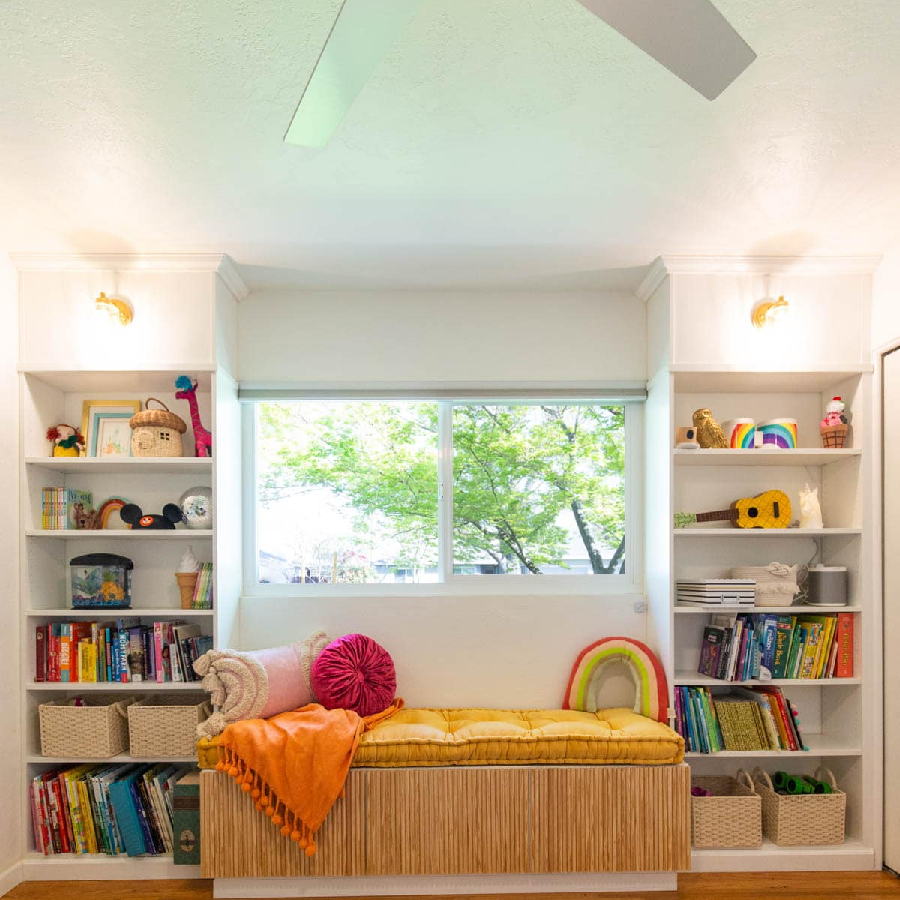
Decorating your bookcase is the final and perhaps the most enjoyable step in building a diy built in bookcase around window. This is your opportunity to showcase your personality, hobbies, and design aesthetic. The right decor can transform your bookcase from a utilitarian storage solution into a stunning focal point of the room. Let’s explore various strategies for organizing books, integrating decorative items, and creating a cozy reading nook that enhances the overall appeal of your space.
Organizing Your Books
Books are the primary focus of any bookcase, and their arrangement plays a vital role in the overall look. There are several ways to organize your books:
1. Alphabetical Arrangement:
Place your books in alphabetical order by the author’s last name or book title. This method is practical, especially for avid readers who frequently reach for specific titles.
2. By Genre or Subject:
Organize books based on their genre or subject matter. Group fiction, non-fiction, biographies, and hobby books together. This method not only looks tidy but also makes it easier to find a book you want to read.
3. Color-Coded:
Arrange books by the color of their spine. This method creates a visually striking and cohesive look. It’s especially effective if you have a large volume of books with varied covers.
4. Vertical and Horizontal Stacking:
Mix things up by placing some books vertically and others horizontally. This breaks the monotony and adds visual interest to the shelves. Horizontal stacks can also serve as pedestals for decorative items.
5. Size Arrangement:
Position books from tallest to shortest or vice versa. This method gives a sleek and organized appearance. This technique can also be combined with color coding for an added layer of sophistication.
Adding Decorative Items
Bookshelves aren’t just for books. Decorative items such as vases, picture frames, and sculptures can add layers of texture and interest, turning your bookcase into a showcase. Here are some tips for integrating decorative items:
1. Personal Artifacts:
Display personal artifacts like family photos, travel souvenirs, or heirlooms. These items add a personal touch and create a story within your bookcase.
2. Plants:
Incorporate plants and greenery. Small potted plants or succulents can add a fresh, natural element to your bookcase. They introduce a burst of color and can soften the overall look.
3. Art Pieces:
Showcase small pieces of art or sculptures. These pieces can serve as focal points and conversation starters. Select items that contrast with your books to make them stand out.
4. Decorative Boxes and Baskets:
Use decorative boxes and baskets to store smaller items. They keep the shelves organized and clutter-free. Choose colors and textures that complement your room’s decor.
5. Layering:
Layer items at different depths on the shelves. Place larger items toward the back and smaller items in front. This creates a dynamic, three-dimensional look.
6. Mirrors and Frames:
Introduce mirrors or frames to add depth and reflect light. These elements can make your shelves appear larger and more open.
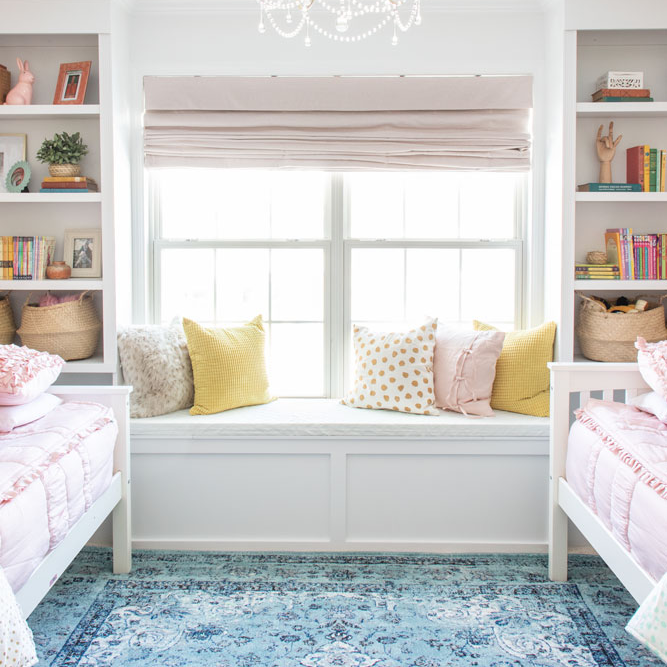
Creating a Cozy Nook
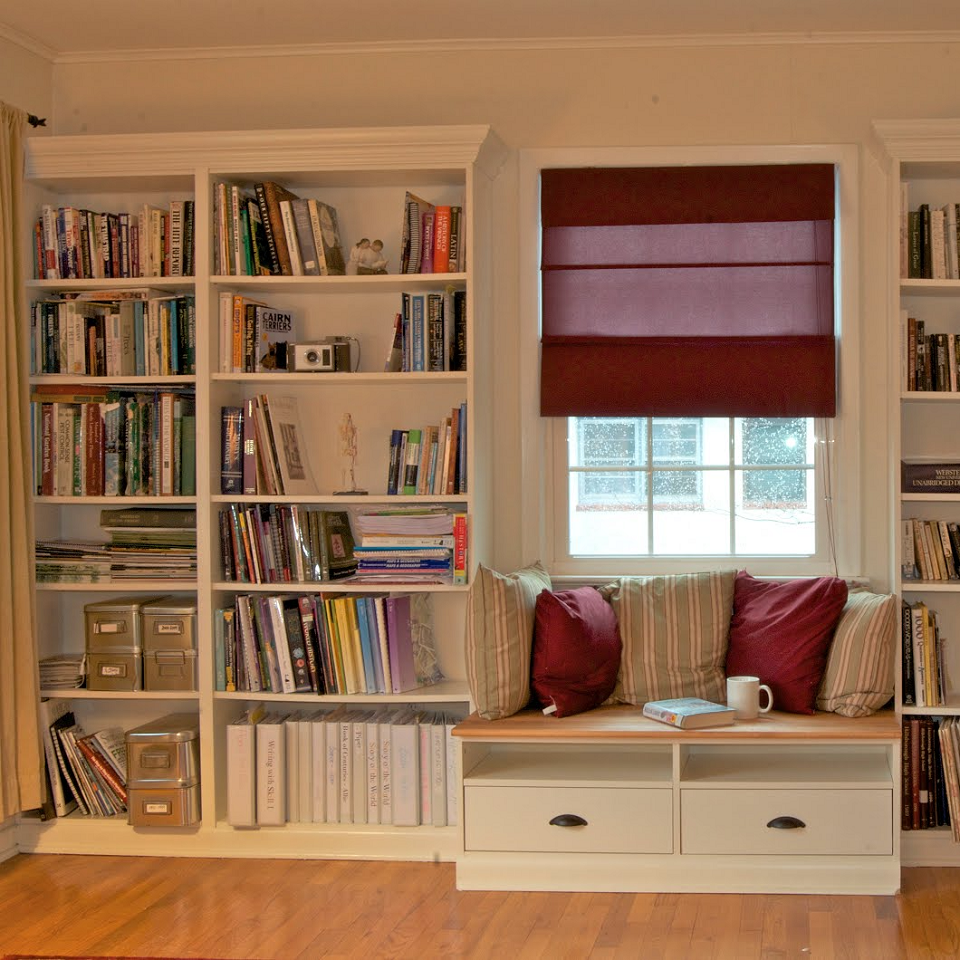
One of the unique features of a built-in bookcase around a window is the potential to create a cozy reading nook. This space can become a serene spot to relax, read, and enjoy the view. Here’s how to create an inviting nook:
1. Seating:
Install a built-in bench or place a comfortable chair with a cushion underneath the window. A bench with storage underneath can also be functional, providing extra space for blankets, magazines, or other items.
2. Cushions and Throws:
Add soft cushions and throws to make the seating area inviting and comfortable. Choose materials and colors that complement your room’s overall color scheme but also stand out to make the space special.
3. Lighting:
Ensure sufficient lighting for reading. Natural light from the window is a bonus, but you may also want to add a table lamp or a small floor lamp. Choose a lamp with an adjustable arm to direct light exactly where you need it.
4. Side Table:
Include a small side table or a built-in ledge where you can place your cup of tea or coffee, glasses, or a reading book. This adds to the functionality of your nook.
5. Personal Touches:
Add personalized touches like a small clock, scented candles, or even a plant. These personal elements make the space uniquely yours and add to its coziness.
Practical Tips for Balancing Decor and Functionality
While decorating, it’s essential to keep a balance between aesthetics and functionality:
1. Avoid Overcrowding:
Don’t overcrowd your shelves with too many items. Leave some empty spaces to avoid a cluttered look. This gives your eyes a place to rest and makes significant decorative items stand out.
2. Regular Maintenance:
Keep your bookcase clean and dust-free. Regularly rotate decorative items and books to keep the look fresh and updated.
3. Practical Storage:
Ensure that frequently used books and items are within easy reach. Reserve higher or lower shelves for items you don’t need to access regularly.
4. Proportion and Scale:
Consider the proportion and scale of items. Mix large and small items to create balance. Too many small items can look cluttered, while too many large items can overwhelm the shelves.
5. Use of Space:
Maximize the use of space. Use the entire height and depth of the shelves. Taller items can occupy the top shelves, while smaller or medium-sized items fit well on eye-level or lower shelves.
Conclusion
Building a DIY bookcase around a window is a rewarding project. It enhances your home’s functionality and aesthetics. With careful planning and attention to detail, you can create a beautiful, custom-built bookcase. Follow this step-by-step guide, and you’ll be enjoying your new bookcase in no time. This project not only adds value to your home but also provides a personal touch that store-bought furniture can’t match. Happy building!


